Kha Tutorial: Part 2
Aug 23, 2020
Hopefully you got everything setup with no problems after finishing the previous tutorial. In this one, I'll just walk you through how to use some of the APIs to actually make something.
Drawing 2D Graphics
The easiest way to draw 2D graphics is via the Graphics2 API. See here for all the available functions. To use it, you need to obtain a reference to a Graphics2 interface, which you can find from a Framebuffer object passed to the rendering handler function. This is the render function from the Project class in the last tutorial:
1 2 3 | |
Before you can draw anything however, you need to call begin(), followed by end() at the end of the draw functions. Example:
1 2 3 4 5 6 7 8 9 10 11 12 13 14 15 | |
The above code should draw a blue square on a white background. Easy right?
Image Assets
Kha can render images, fonts, and even videos. To do this, you need to place the assets into a Kha asset directory. If you recall from the khafile.js we wrote earlier, we added one to our project that points to a folder named Assets. So all you have to do is copy your images into that folder, and Kha will use the magic of Haxe Macros to auto-generate code so that you can even list all your assets in any editor that supports tab completion.
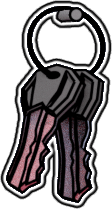
For example, download this image and put it in your Assets folder. Name it anything you want, like "keys1.png":

When you do that, a definition will be automatically generated (usually the next time you compile) so you can refer to that image as follows:
1 | |
This is how you would use it:
1 2 3 4 5 6 7 8 9 10 11 12 13 14 15 16 17 18 19 20 21 22 23 | |
That's all it takes! Note that we are obtaining the reference to our image within the onAssetsLoaded function. Recall that this is our handler for when assets finish loading, so this is a safe spot to access our image. Also, if you change the draw color before drawing an image, then the image will be tinted. Setting it to white resets this.
Font Assets
Font assets work pretty much the same as image assets: put them in the assets folder, then access them via the kha.Assets.fonts.* API. Here is an example of how to use them:
- Find yourself a TrueType font, and put in the Assets folder. Here's one called Roboto from Google Fonts
- Name it something simple, like
roboto.ttf - in the onAssetsLoaded function, obtain a reference to it via
kha.Assets.fonts.roboto - Set the currently active font
- Draw some text using the
drawStringfunction
1 2 3 4 5 6 7 8 9 10 11 12 13 14 15 16 17 18 19 20 21 22 23 24 | |
It can't get any easier than that!
Rotating, Scaling, And Other Transformation
The easy way to do scaling is to use the drawScaledSubImage function, but that's not going to let you do any rotations, and it won't work for anything besides images.
To do proper transformations, you need to make use of the transformation matrix stack. If you've ever worked with graphics before, this should be a familiar concept to you. If not, you should read up on it. Basically, it is what it sounds like: a stack of transformation matrices.
Kha uses a built-in Matrix class FastMatrix3, and the Graphics2 API provides methods for pushing and popping. Example:
1 2 3 4 5 6 7 8 9 10 11 | |
Again, super easy!
© Alejandro Ramallo 2025